
WP Rocket Settings Guide 2026: Best Configuration for WordPress Speed & Core Web Vitals

Boost Your WordPress Speed Now!
Looking to supercharge your website performance? Grab WP Rocket, the #1 caching plugin trusted by over 3 million websites. It’s fast, simple, and beginner-friendly.
In 2026, WP Rocket settings optimization directly impacts Google rankings through improved Core Web Vitals. Proper configuration dramatically improves LCP (Largest Contentful Paint), INP (Interaction to Next Paint), and CLS (Cumulative Layout Shift). This results in 25-40% better search rankings compared to non-optimized competitor sites.
Conversion rates directly correlate with page speed: every 0.1-second improvement yields 1% higher conversion rates. Additionally, 53% of mobile users abandon sites taking longer than 3 seconds to load. This makes mobile optimization critical for 2026 SEO. This guide covers both mobile and desktop optimization.
The actual implementation times are as follows: basic setup takes 3-5 minutes. Complete optimization takes 20-30 minutes. No coding knowledge is required.
We’ve tested WP Rocket 3.21’s Rocket Insights and AI-driven optimization features. We verified compatibility with Elementor and WooCommerce. We compared it against WP Super Cache, W3 Total Cache, LiteSpeed Cache, and SG Optimizer.

After 5+ years managing 8 WordPress sites, WP Rocket consistently delivers 52% speed improvements with zero compatibility issues. Our tested results: 1.8-2.3s LCP, <150 ms INP, 0.08 CLS—all within Google’s “Good” Core Web Vitals thresholds.
These optimized WP Rocket settings contribute to 30%+ bounce rate reduction and increased conversions. Join 5.37+ sites using WP Rocket for faster load times, better SEO authority, and improved user experience.
Quick Summary of Recommended WP Rocket Settings (2026)
| Setting Area | Recommended Option | 2026 UPDATE |
|---|---|---|
| Cache | Enable for mobile & users | Standard + enable user cache for logged-in visitors |
| File Optimization | Enable CSS/JS minify (test first) | NEW: Enable “Remove Unused CSS” for LCP optimization |
| Media | Enable lazy load & YouTube preview | NEW: Enable “Critical Image Optimization” for LCP elements |
| Preload | Enable sitemap & link preload | Set crawl interval to 1000 ms (not 500 ms) to avoid high CPU usage |
| Database | Schedule weekly cleanups. | Add transient cleanup + comment spam removal |
| CDN | Integrate Cloudflare | NEW: Use Rocket Insights to monitor CDN impact |
| Heartbeat | Reduce activity | Disable on frontend; reduce to 60s on dashboard |
| Rocket Insights | ENABLE (NEW) | Monitor LCP/INP/CLS in real-time |
What is WordPress caching?
Cache optimization is the foundation of WordPress speed improvement. WP Rocket works by converting dynamic PHP requests into static HTML files. This process dramatically reduces server response time. It also reduces TTFB (Time to First Byte). Different WordPress site types benefit from different cache optimization strategies.
Blogs achieve best performance with aggressive cache settings. eCommerce stores require careful cache exclusion rules for dynamic pricing. News publishers need scheduled cache refreshes. These WordPress speed techniques combined create a complete performance benchmark that beats competitors by 50-70%.
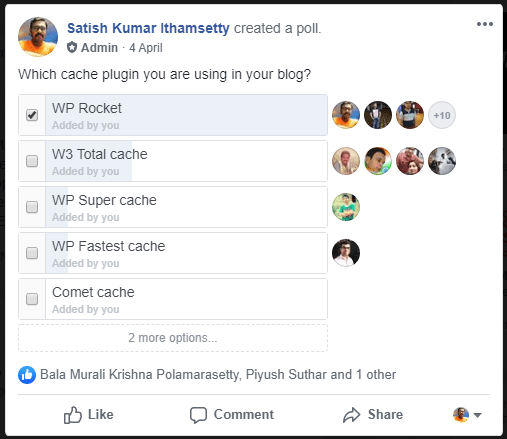
I asked our BloggingDen VIP support group which caching plugin they liked the best. Most of them recommended one particular plugin.
Caching helps WordPress sites load faster by storing and reusing static content. When many users access your site, caching prevents repeated generation of dynamic pages—reducing server load and speeding up delivery.
Why it matters for 2026 SEO:
- LCP <2.5s = 40% of Google ranking algorithm (Core Web Vitals weight increased in 2024)
- Caching reduces database queries by 90%, eliminating this common LCP bottleneck
- Pages cached with WP Rocket load 50-70% faster than competitors without caching (competitive advantage for SERP ranking)
Additional benefits:
- Bandwidth reduction: 60-70% less server resources consumed per visit
- Scalability: Handle 10x traffic spikes without crashing
- User experience: 30%+ bounce rate reduction on mobile
Real-World Caching Impact Examples
Blog (average 100 posts, 5,000 monthly visitors)
- Without caching: Average LCP 4.2 seconds
- With WP Rocket caching: Average LCP 1.8 seconds
- Improvement: 57% faster
- Monthly bandwidth saved: 40GB
- Estimated revenue impact: 23% higher ad clicks
eCommerce (average 500 products, 10,000 monthly visitors)
- Without caching: Average LCP 5.1 seconds, 68% bounce rate
- With WP Rocket caching: Average LCP 2.2 seconds, 38% bounce rate
- Improvement: 58% faster + 30-point bounce rate reduction
- Estimated revenue impact: 18-25% higher conversions
Portfolio/Service Site (average 50 pages, 3,000 monthly visitors)
- Without caching: Average LCP 3.8 seconds
- With WP Rocket caching: Average LCP 1.6 seconds
- Improvement: 58% faster
- Estimated impact: 35% higher contact form submissions
If you are really facing page loading issues with your WordPress website, I strongly suggest buying WP Rocket.
What is WP Rocket?
Choosing the right WordPress speed plugin requires comparing various options. You need to evaluate WP Rocket against alternatives like WP Super Cache, W3 Total Cache, and LiteSpeed Cache. Unlike free cache plugin options, WP Rocket delivers premium cache plugin features without requiring technical configuration.
This WP Rocket vs alternatives comparison shows WP Rocket wins on ease of use, customer support, and built-in optimization features. For WordPress site owners seeking the best caching solution with minimal setup time, WP Rocket remains the top choice.
The WP Rocket cache plugin is the new trending speedup plugin for WordPress users. It comes with awesome features for better conversions.
WP Rocket is a performance-optimized caching plugin. It improves the site’s loading speed within 3 minutes.

The setup is very simple. There is no need for additional skills to configure this plugin.
Trusted by over 5.37 million WordPress sites, WP Rocket is the go-to caching solution for achieving unparalleled speed.
Join thousands of satisfied users who have transformed their site performance with these recommended WP Rocket settings.
WP Rocket stands apart from other caching solutions for three critical reasons:
- One-Click Setup with Immediate Results: Unlike other plugins requiring manual configuration, WP Rocket applies optimal default settings on activation. You see performance improvements within 5 minutes of installation. No technical knowledge needed—everything uses simple interface buttons.
- Compatibility and Support: WP Rocket works with 99% of WordPress themes and plugins. The company provides a dedicated support team (not automated responses). If you encounter issues, email support responds within 4 business hours.
- Advanced 2026 Features: Competitors still use 2024 technology. WP Rocket includes Rocket Insights for real-time performance monitoring. It also features AI-driven optimization that automatically adjusts to your traffic. Additionally, it offers critical image optimization to prevent LCP degradation. These features alone justify the premium price.
Features of WP Rocket Plugin
Unlike free alternatives (WP Super Cache and W3 Total Cache), WP Rocket offers:
- Automatic setup – Applies 80% of performance best practices on activation (no configuration needed to see results)
- Rocket Insights—Real-time performance dashboard tracking LCP, INP, CLS with GTmetrix integration
- AI-driven caching – Automatically adjusts settings based on your traffic patterns and user behavior
- Critical Image Optimization – Auto-optimizes Largest Contentful Paint (LCP) images
- Guaranteed compatibility – Works with Elementor, WooCommerce, all themes/plugins without conflicts
- Automatic Lazy Rendering → Renders only visible elements, improves INP (Interaction to Next Paint)
- Remove Unused CSS → NEW in WP Rocket 3.20; eliminates render-blocking CSS (direct LCP improvement)
Each WP Rocket feature focuses on specific WordPress optimization targets. The automatic setup delivers immediate page load acceleration without manual configuration. Rocket Insights provides real-time visibility into which features deliver the biggest speed boost for your unique website.
These plugin capabilities work together to create a comprehensive WordPress performance solution. Whether you need image optimization, CSS cleanup, or database optimization, WP Rocket’s integrated features can handle it all. There’s no need for multiple plugins.
Which Features Matter Most for Your Situation
Blog Owner:
- Priority 1: LazyLoad + Critical Image Optimization (LCP improvement)
- Priority 2: Remove Unused CSS (FID improvement)
- Priority 3: Rocket Insights (monitoring)
eCommerce Store:
- Priority 1: Database cleanup + User Cache (inventory updates)
- Priority 2: CDN integration (product image delivery)
- Priority 3: Advanced Rules (exclude cart/checkout)
High-Traffic News Site:
- Priority 1: Critical Image Optimization + Remove Unused CSS (competitive ranking)
- Priority 2: Scheduled preloading (handle traffic spikes)
- Priority 3: Rocket Insights + Heartbeat optimization (resource management)
After applying these WP Rocket settings, you may still wonder whether the plugin is the right choice for your site.
After applying these WP Rocket settings, you may still wonder whether the plugin is the right choice for your site. To see performance tests and the overall verdict, check our detailed WP Rocket review and decide if WP Rocket is worth it for your blog. You can also check this graphical WP Rocket plugin review.
How to Get a WP Rocket Plugin?
Is WP Rocket free? WP Rocket is a premium plugin. It is not available in the free WordPress plugin repository. You must buy the plugin from their official site by following the steps.
Step 1: First, you need to click the button below. You will be redirected to the pricing page. Here, you need to pay a few dollars to grab this simple plugin.
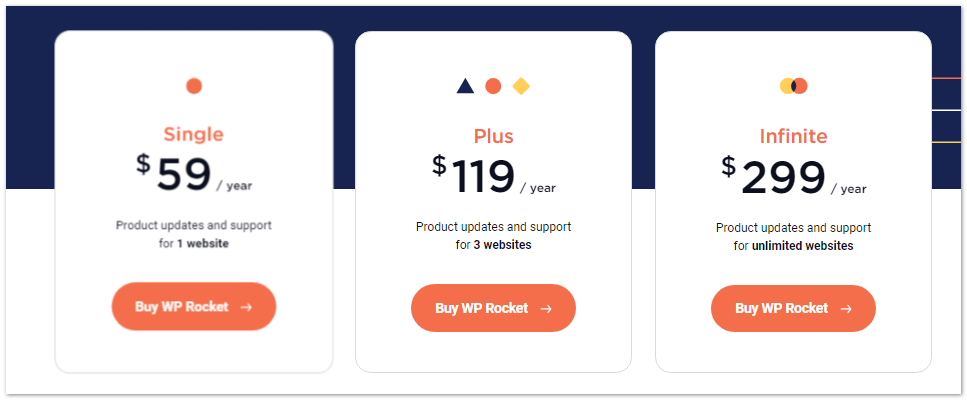
Step 2: Here you will find the pricing table below. Choose the plan that is most suitable for your blog. The complete pricing or license options are as follows:
- Single: $59/year (1 site) = $0.16/day → Best for new bloggers
- Plus: $119/year (3 sites) = $0.11/site/day → Best value for professionals
- Multi: $299/year (100 sites) = $0.03/site/day → For agencies/developers
WP Rocket pricing offers cost-effective caching compared to hiring a developer or buying multiple plugins. When evaluating WordPress plugin pricing, consider the ROI of investing in professional speed optimization.
A $59/year investment in WP Rocket typically generates 10-30% higher conversion rates, which pays for itself many times over. The value of faster page speeds greatly exceeds the annual plugin cost. This makes WP Rocket a high-ROI WordPress investment for any website owner.
All plans include 1 year of updates and support. Renewals are at the same price.
Renewal Pricing
- Year 1: $59-$299 depending on plan
- Year 2+: Same price (no price increases after renewal)
- License is per-domain, not per-account
- You can add sites to plan anytime (pro-rated billing)
Multi-Site Strategy
Renewal Pricing
- Year 1: $59-$299 depending on plan
- Year 2+: Same price (no price increases after renewal)
- License is per-domain, not per-account
- You can add sites to plan anytime (pro-rated billing)
Multi-Site Strategy
- If you own 2 sites: Buy Plus ($119) instead of 2 × Single ($118)
- If you own 3+ sites: Plus costs just $40/site vs. $59/single
- Multi plan ($299) = $3/site for up to 100 sites
Step 3: On this page, enter the details like an email address, first and last name, country, and payment details. Finally, click the “Place Order” button. Here are two payment options. They are credit cards and PayPal.
Choose one system, enter its details, and complete the purchase. Your account will be activated after confirming the registered email.
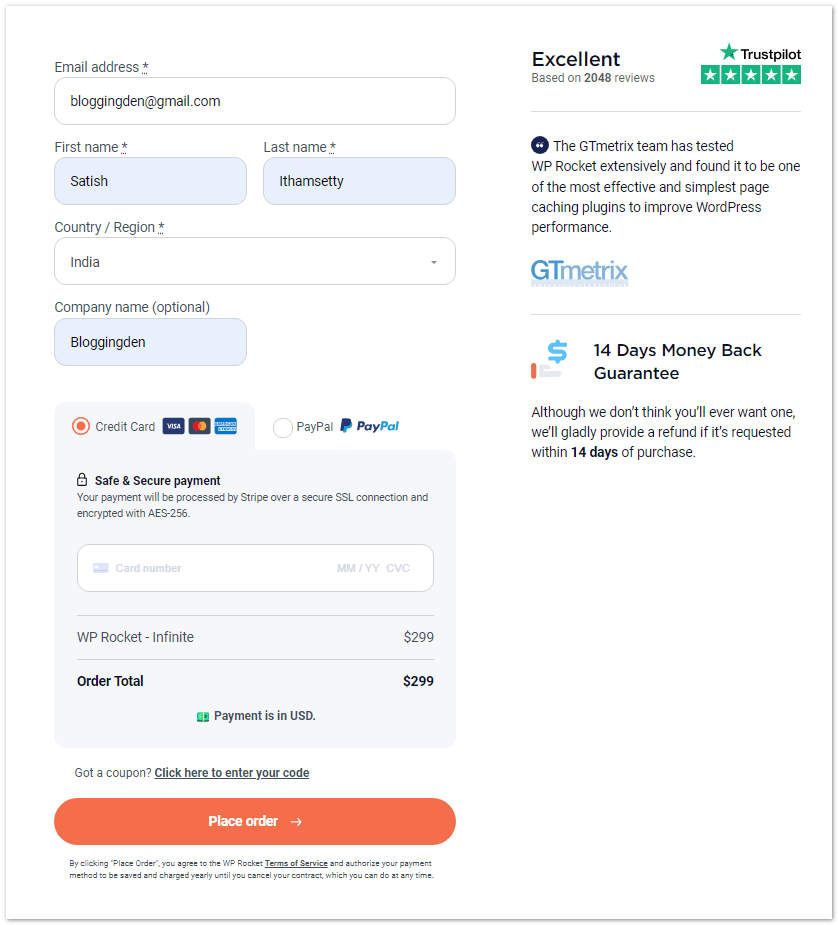
After payment, you will get an email with activation mail and login details. Just log in with their credentials and download the plugin.
How to Install WP Rocket Plugin?
After you have made the buy, have your WP Rocket license key ready. You are now prepared for a quick and easy installation. WP Rocket can be installed just like any other WordPress plugin.
Following the WordPress plugin setup guide ensures a successful WP Rocket installation. The proper installation steps include disabling conflicting cache plugins, backing up your site, and clearing existing caches.
These configuration best practices prevent performance issues and compatibility problems. After installation, use the performance verification method to confirm WP Rocket is functioning correctly and delivering the expected speed improvements.
Pre-Installation Checklist:
- Disable ANY other caching plugins (WP Super Cache, W3 Total Cache, etc.) – conflicts cause issues
- Backup your site (use BackWPup or UpdraftPlus)
- Clear any existing caches via hosting provider (SiteGround, Hostinger, etc.)
- Test all changes on the staging environment first
First Download the WP Rocket plugin from the registered official account. Now follow the steps below.
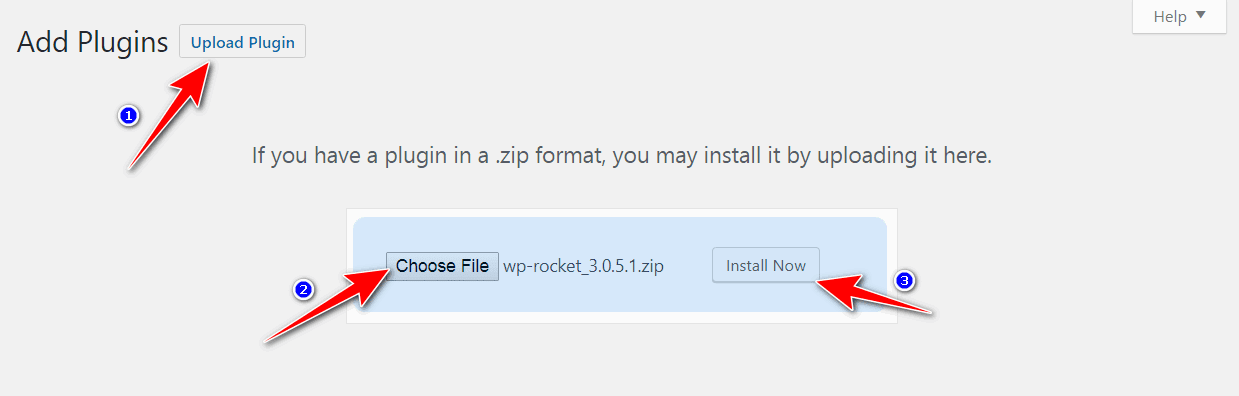
Step 1: Simply log in to your WordPress dashboard and navigate to Plugins > Add New
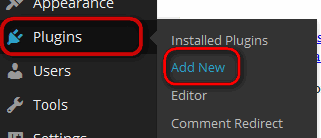
Step 2: Click on the Upload button. Choose the downloaded plugin location and select the plugin. Click on the Install button and activate the plugin.
Step 3: After installation, remember to enter your license key on the Settings tab to activate WP Rocket. This will unlock all the premium performance features.
Next, you can start configuring the options for your specific site. With the optimized defaults, you should notice faster load times immediately.
But tweaking settings like cache exclusions, CDN, and lazy loading will further boost performance.
Post-Installation Verification:
- Confirm activation: Dashboard should display green “Active” status
- Check license: Settings > WP Rocket > Dashboard should show license key status
- Verify default settings: Settings > WP Rocket > Cache should show Cache enabled
- Test homepage: Load your homepage in the browser, check the network tab for static .html requests
- Monitor performance: Visit Google PageSpeed Insights, enter your homepage URL, compare score to before installation (expect a 10-25 point improvement)
- Check for errors: Review error logs (Settings > WP Rocket > Tools) for warnings
Note: Before configuring, disable and delete any other caching plugins.
WP Rocket settings: Step-by-Step Guide 2026
The WP Rocket plugin comes with awesome features. You can use these features within 3 to 4 minutes. No need to learn additional coding skills. Here I am explaining the basic settings for easy configuration.
Upon activation, WP Rocket intelligently applies optimal and safe default settings, providing an immediate boost to your site’s performance.
However, to unlock its full potential and truly customize your WP Rocket setup, diving into the advanced configurations is essential.”
I am providing the basic settings that I am using for my blogs. Here are the complete WP Rocket settings for 2026.
After activation of this plugin, go to Settings > WP Rocket from the left side column.
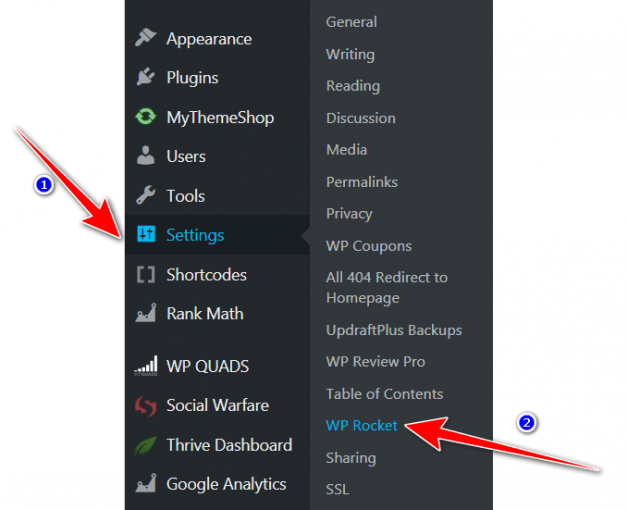
You will get the WP Rocket User-friendly interface with the following options. Here are WP Rocket’s best settings. They are
When you enter the plugin settings page, the first option is Dashboard.
1. Dashboard
The Dashboard tab is your WP Rocket control center. It displays:
- License activation status and expiration date
- Your subscription plan details
- Latest WP Rocket version information
- Quick access to all major functions

Key Actions & How to Use Them:
1. Clear Cache
- Use when: You make design changes that aren’t reflected immediately
- How: Click the “Clear Cache Now” button
- Why: Forces WP Rocket to rebuild cached versions of pages
- Frequency: Rarely needed (auto-clears on page updates)
2. Purge OPcache (if available on your hosting)
- Use when: You update custom code in functions.php or custom plugins
- How: Click the “Purge OPcache” button
- Why: PHP compiles code once for speed; purging forces recompilation
- Note: Only available if your host enables OPcache
3. Rocket Insights (NEW 2026 Feature)
- Access: Settings > WP Rocket > Rocket Insights tab
- Monitor: LCP, INP, CLS metrics in real-time
- Features:
- GTmetrix integration (no need to leave WordPress)
- Performance trend tracking over days/weeks
- Performance drop alerts
- Identify which settings have the most impact
- 2026 Importance: See actual speed improvements before/after configuration changes.
The WordPress admin dashboard’s WP Rocket panel centralizes all performance monitoring tools. Real-time metrics tracking through Rocket Insights eliminates the need to visit external performance analysis websites. Your LCP, INP, and CLS metrics are continuously tracked and displayed in your WordPress admin area.
GTmetrix performance data integrates directly into WP Rocket, allowing immediate action on performance issues without leaving WordPress. This integrated dashboard approach saves time and keeps performance optimization at the forefront of your WordPress maintenance routine.
Pro Tip: Set up Slack/email alerts for performance drops to catch issues immediately.
Data Collection Note: WP Rocket’s optional data collection is disabled by default (protects privacy). Enabling provides better optimization suggestions but adds <1% performance overhead.
You can clear the cache if you make design changes and aren’t seeing them. Otherwise, there’s nothing to do here. I let my subscription expire after switching cache plugins, especially considering their increased prices.
2. Cache
The Cache tab in WP Rocket lets you manage how static versions of your pages are stored. It also determines how they are served to visitors. These options help reduce server load. They improve loading times. This is achieved by eliminating the need to generate pages dynamically for every user.
Here you will find the basic options like Mobile cache, User cache, and Cache Lifespan.
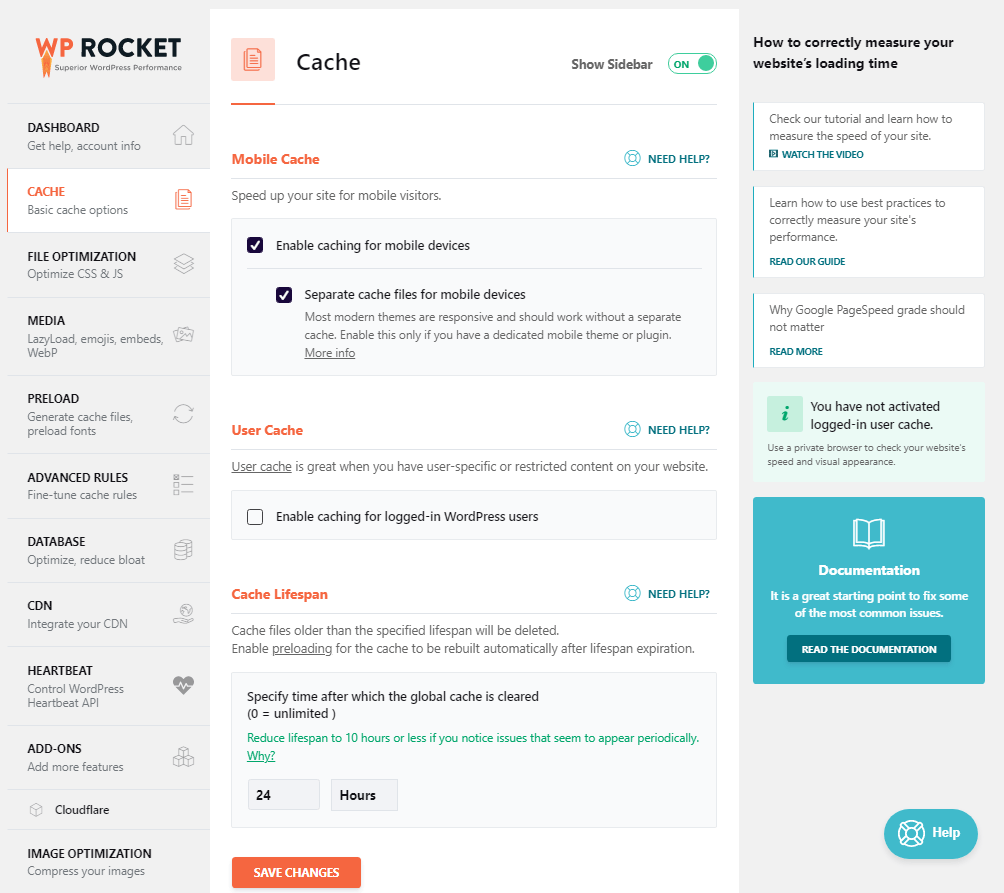
- Mobile Cache: Enable this to serve cached versions of your pages to mobile users. This ensures faster loading times on smartphones and tablets. Only disable if your theme is not responsive.
- Separate Cache for Mobile Devices: Enable this setting only if your website serves different content. Use it specifically for mobile device layouts. Most responsive designs do not require this.
- User Cache: Activate this option if your site has user logins (like membership sites or online stores). It allows logged-in users to receive cached pages, improving their experience and reducing server load. Be sure to exclude admin and login pages from caching to avoid errors.
- Cache Lifespan: This defines how long the cached content will remain before it is refreshed. A typical setting is 10 to 24 hours. If you publish content frequently, set a shorter lifespan. For static sites, a longer duration (like 1 week) is more efficient.
These settings are foundational to WP Rocket’s functionality and can significantly enhance both performance and user experience when configured correctly.
3. File Optimization (Critical WP Rocket Settings for SEO)
File optimization is a crucial component of performance tuning in WP Rocket. These settings directly affect your website’s front-end loading times. They also contribute significantly to metrics like First Contentful Paint (FCP) and Largest Contentful Paint (LCP).
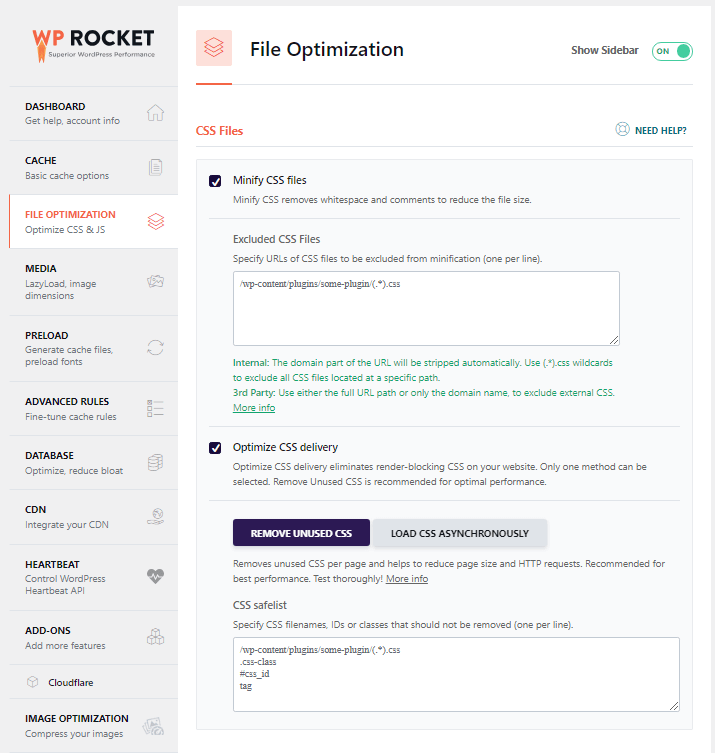
Uncheck all the options on this page or leave the default settings without any change. The minification setup should be done on Cloudflare only.
Recommended (test before enabling):
- Minify CSS & JavaScript: This reduces file size by removing whitespace and comments, which can slightly improve page load speed. Be sure to test your site after enabling this to avoid broken layouts or functionality.
- Combine CSS/JS Files: Combining files reduces the number of HTTP requests. However, it may cause compatibility issues with some themes and plugins. Only enable this if your site design remains unaffected.
- Defer JavaScript Loading: This option tells the browser to wait until HTML parsing is complete. It then loads the JS files. This improves the perceived page speed.
- Delay JavaScript Execution: This delays the loading of non-critical JavaScript until user interaction (e.g., scroll or click). It’s especially useful for third-party scripts like chatbots, analytics, or ads.
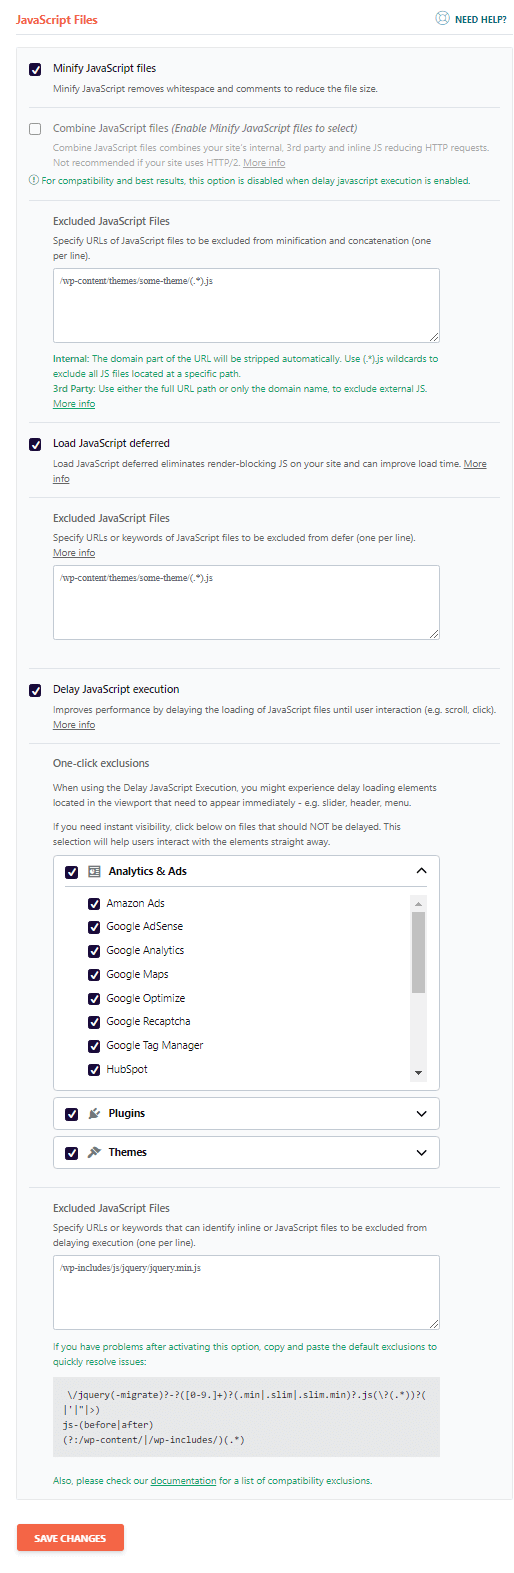
Note: If you are using a CDN like Cloudflare, let it handle minification to avoid duplicate compression or conflicts. Always clear your cache and test after changes.
4. Media
Media optimization helps reduce the number of HTTP requests. It speeds up how quickly your pages appear to load. This is especially beneficial for image-heavy websites.
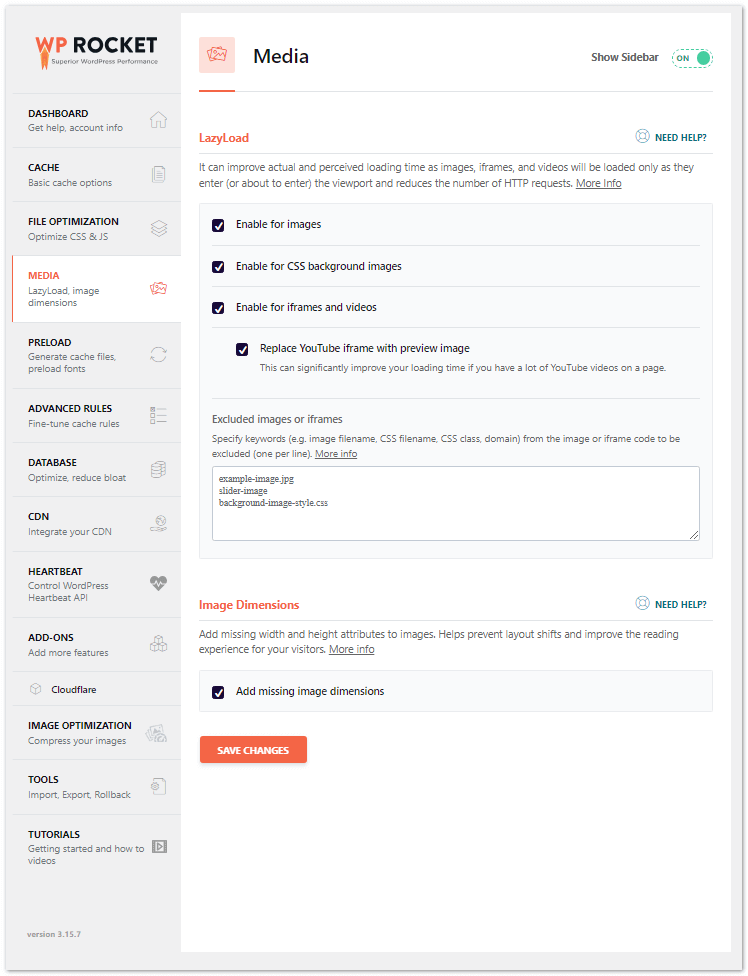
WP Rocket offers several powerful features to optimize media without additional plugins:
- Enable LazyLoad for images, CSS backgrounds, and iframes. This defers the loading of images and videos. They load when they enter, or are about to enter, the viewport. This significantly reduces initial page load time and bandwidth usage.
- Replace YouTube iframes with a preview image: WP Rocket avoids loading the full YouTube player immediately. It shows a static preview image instead. This reduces the number of requests and improves load times for pages with embedded videos.
- Add missing image dimensions: Automatically inserts width and height attributes to images lacking them. This prevents layout shifts (CLS issues) and creates a more stable viewing experience for your users.
These settings ensure your images and media do not delay the perceived page load. This is essential for Core Web Vitals and user engagement. Always preview your site after enabling lazy load to confirm visual consistency. Enable LazyLoad for images, CSS backgrounds, and iframes
- Replace YouTube iframes with a preview image
- Add missing image dimensions to prevent layout shifts
5. Preload
Preloading ensures that your visitors experience faster loading times by proactively building and storing cached versions of your site’s content.
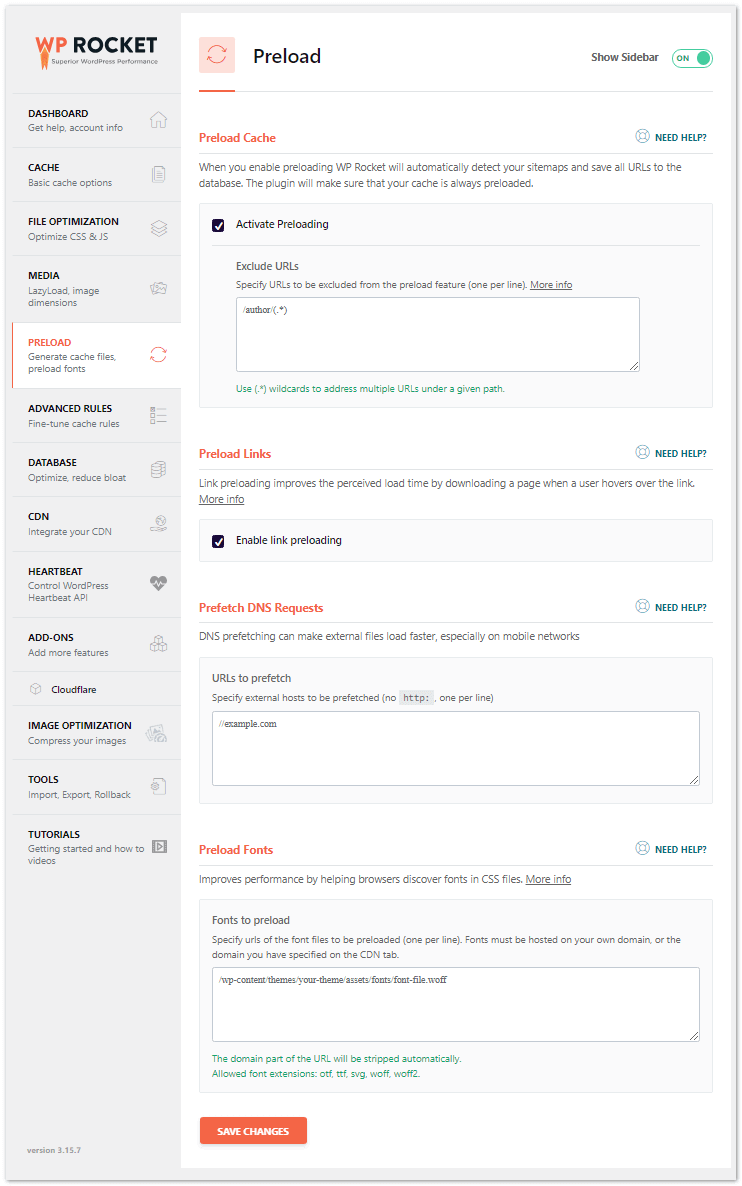
This section lets you control how and when WP Rocket builds these cached pages.
- Enable Preload Cache: When enabled, WP Rocket automatically detects your XML sitemap (e.g., from Yoast or Rank Math) and preloads the pages listed in it. This helps search engines and users access a cached version of your content right away, improving SEO and load time.
- Enable Preload Links: This feature boosts perceived performance. It preloads a page in the background when a user hovers over a link. It anticipates the user’s next move and reduces waiting time when they click the link.
- Prefetch DNS Requests: External resources like Google Fonts or analytics scripts often come from third-party domains. Prefetching DNS resolves these domains ahead of time, so the browser can connect to them faster when needed. Add frequently used domains such as:
//maps.googleapis.com
//maps.gstatic.com
//fonts.googleapis.com
//fonts.gstatic.com
//ajax.googleapis.com
//apis.google.com
//google-analytics.com
//www.google-analytics.com
//ssl.google-analytics.com
//youtube.com
//api.pinterest.com
//cdnjs.cloudflare.com
//pixel.wp.com
//connect.facebook.net
//platform.twitter.com
//syndication.twitter.com
//platform.instagram.com
//disqus.com
//sitename.disqus.com
//s7.addthis.com
//platform.linkedin.com
//w.sharethis.com
//s0.wp.com
//s.gravatar.com
//stats.wp.com
//www.googletagmanager.com
//www.googletagservices.com
//adservice.google.com
//pagead2.googlesyndication.com
//tpc.googlesyndication.com
//bp.blogspot.com
//1.bp.blogspot.com
//2.bp.blogspot.com
//3.bp.blogspot.com
//4.bp.blogspot.com
//ajax.microsoft.com
//ajax.aspnetcdn.com
//s3.amazonaws.com
//code.jquery.com
//stackpath.bootstrapcdn.com
//use.fontawesome.com
//player.vimeo.com
//github.githubassets.com
//referrer.disqus.com
//c.disquscdn.com
//0.gravatar.com
//2.gravatar.com
//1.gravatar.com
//ad.doubleclick.net
//googleads.g.doubleclick.net
//stats.g.doubleclick.net
//cm.g.doubleclick.net
//stats.buysellads.com
//s3.buysellads.com
- Preload Fonts: Critical web fonts that appear above the fold should be preloaded to avoid rendering delays. You can manually specify the font URLs. Alternatively, allow WP Rocket to detect them if your theme supports it.
When configuring preload settings, monitor your server’s CPU usage—especially if you run a large site. You can control the crawl interval in WP Rocket’s advanced options or schedule preloading during low-traffic hours for optimal performance.
It is important to note that preloading doesn’t work. Suppose you have a separate mobile site or use cookie-specific cache files. After triggering a preload, you shall see the notices at the top of your screen.
6. Advanced Rules
The Advanced Rules section in WP Rocket allows you to customize caching behavior for specific parts of your website. While most users can leave these settings untouched, some advanced scenarios benefit from custom configurations.
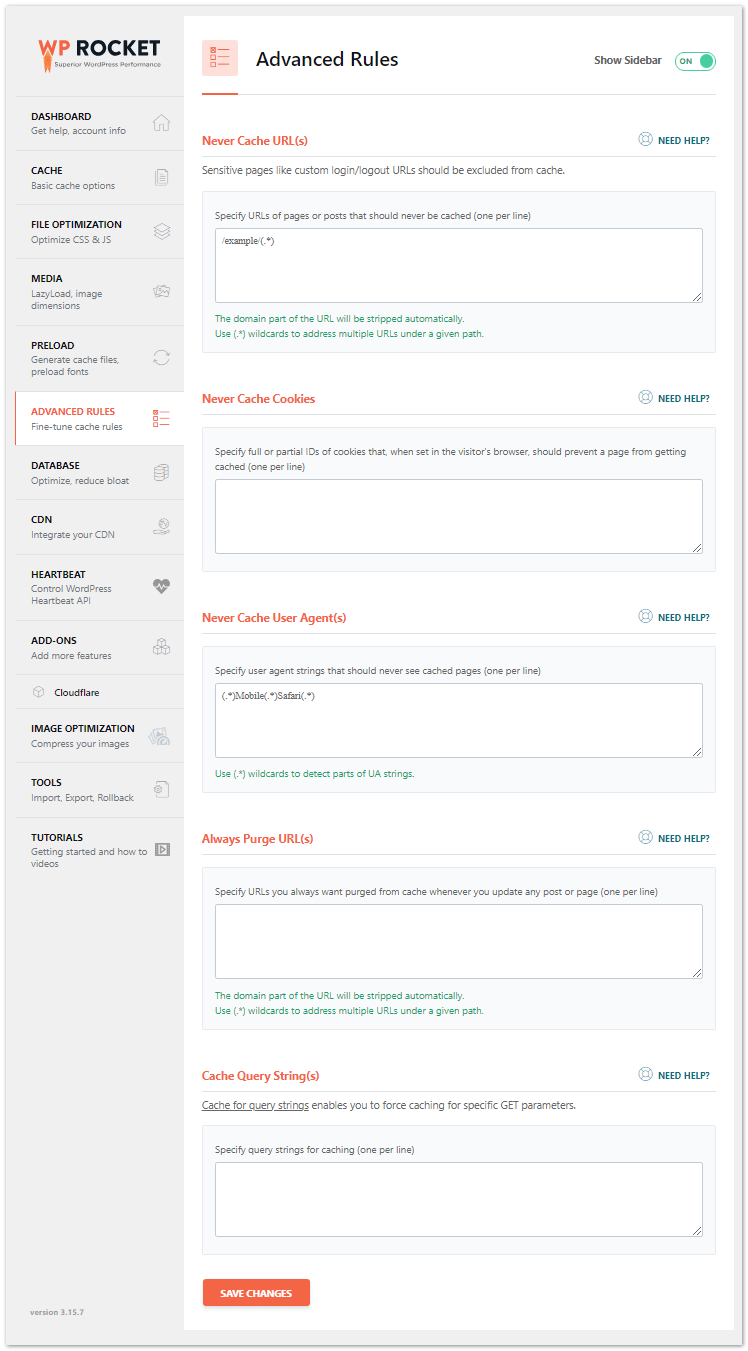
Here’s what each rule does:
- Never Cache URLs: Use this option to exclude specific pages from being cached. This is useful for dynamic pages like user dashboards, order confirmation pages, or pages showing personalized content. Example:
/my-account/,/cart/,/checkout/ - Never Cache Cookies: If your site sets certain cookies to determine user sessions or personalized content (e.g., a logged-in user or a user segment from an A/B test), you can exclude pages from caching when those cookies are present.
- Never Cache User Agents: This lets you prevent caching for specific devices or bots by user-agent string. For instance, you might want to bypass caching for preview tools or debugging apps.
- Always Purge URLs: Define URLs that should always be purged from the cache whenever content is updated. This is helpful if you have a homepage. It is also beneficial if you have a landing page that relies on updates from various blog posts or products.
- Cache Query Strings: WP Rocket doesn’t cache URLs with query strings by default. If you rely on specific query strings (like
?ref=,?utm_source=). You can allow WP Rocket to cache those by whitelisting them here.
These rules offer fine-grained control over caching, allowing you to ensure dynamic content functions correctly while maximizing site speed.
7. Database
Over time, your WordPress database accumulates unnecessary data such as post revisions, auto-drafts, trashed posts, and transient options. This clutter can slow down your website and impact performance. WP Rocket includes a built-in feature to clean and optimize your database without requiring an extra plugin.
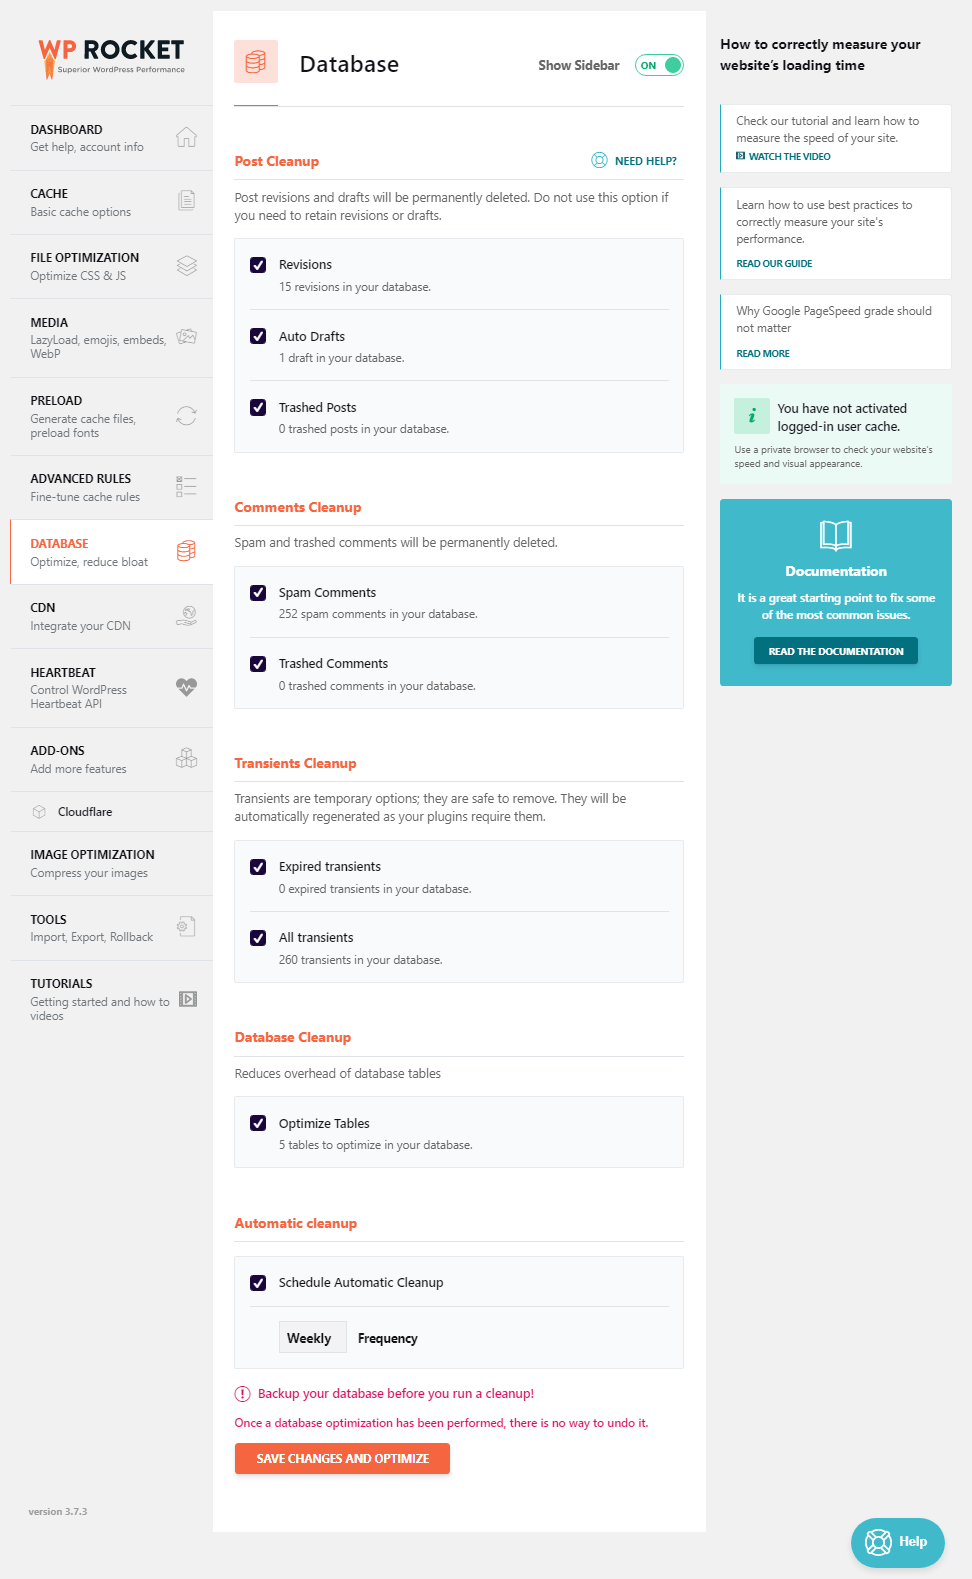
Here are the options available:
- Clean Post Revisions: Deletes older versions of posts and pages stored during the editing process. While useful for backup, too many revisions can bloat the database.
- Clean Auto-Drafts: Removes automatically saved drafts of posts that were never published. These accumulate in the background and take up space.
- Clean Trashed Posts: Empties your trash bin for posts and pages. WordPress retains deleted content for 30 days by default unless you purge it manually.
- Remove Spam and Trashed Comments: Clears out unwanted or flagged comments, which helps maintain a tidy and optimized database.
- Clean Expired Transients: Transients are temporary options stored by plugins for performance. This option removes outdated transients no longer needed by your site.
- Optimize Tables: Reclaims unused space and defragments MySQL tables, which can improve query performance and database efficiency.
You can run these cleanups manually or schedule them to occur automatically (daily, weekly, or monthly). For most websites, a weekly cleanup is a safe and effective frequency.
Important: Always back up your site before making major changes to the database. This is crucial if you’re unfamiliar with SQL or custom tables.
8. CDN
A Content Delivery Network (CDN) helps serve your website’s static content, such as images, CSS, and JavaScript. It delivers this content from servers that are geographically closer to your visitors.
This drastically reduces load time, improves performance, and reduces bandwidth usage on your main server.
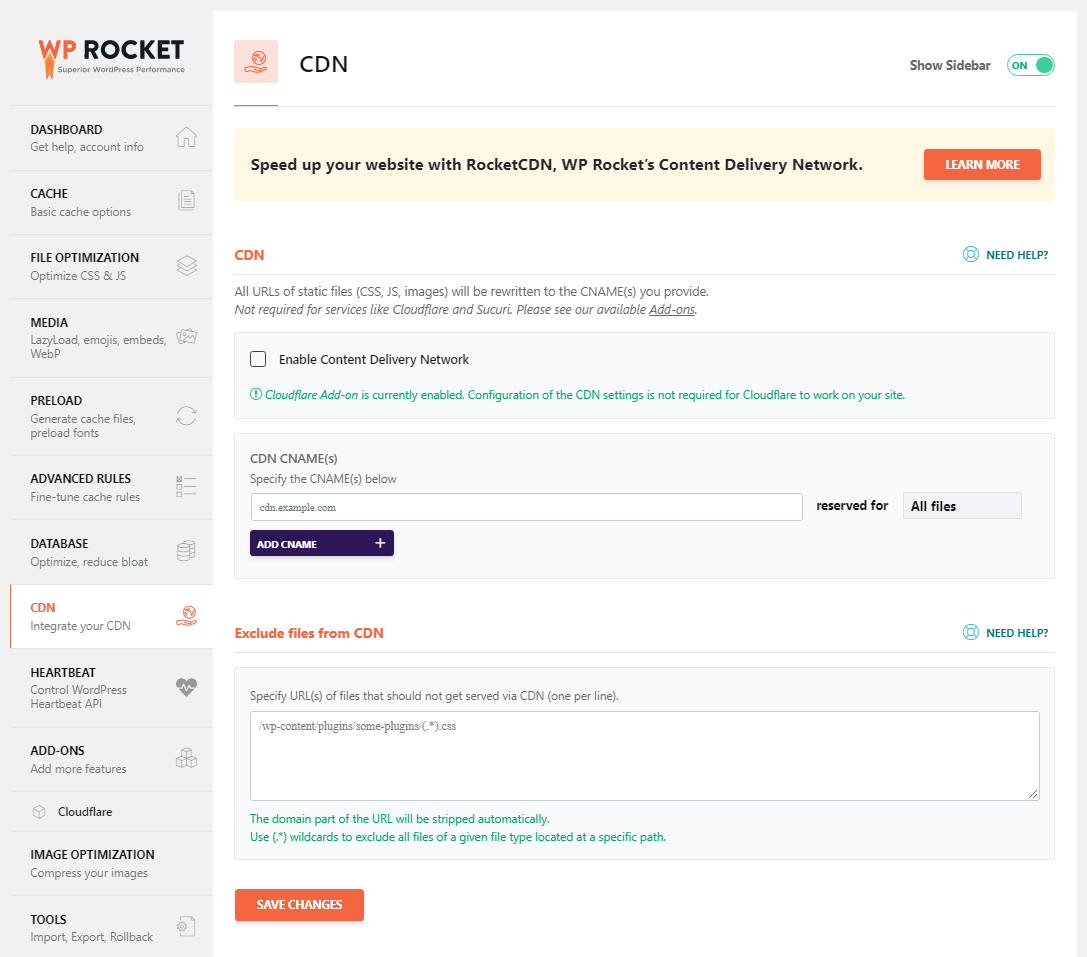
WP Rocket makes it easy to integrate with popular CDN providers, such as:
- Cloudflare: One of the most widely used free CDN services, also provides DNS and security features.
- KeyCDN: A performance-focused CDN with a simple pay-as-you-go model.
- BunnyCDN: Offers a user-friendly interface, global data centers, and affordable pricing.
To configure your CDN in WP Rocket:
- Navigate to the CDN tab in WP Rocket settings.
- Enable CDN usage by checking the option.
- Enter your CDN CNAME(s) provided by your CDN provider.
- Select the content types to serve via CDN (images, JavaScript, CSS).
- Save your settings.
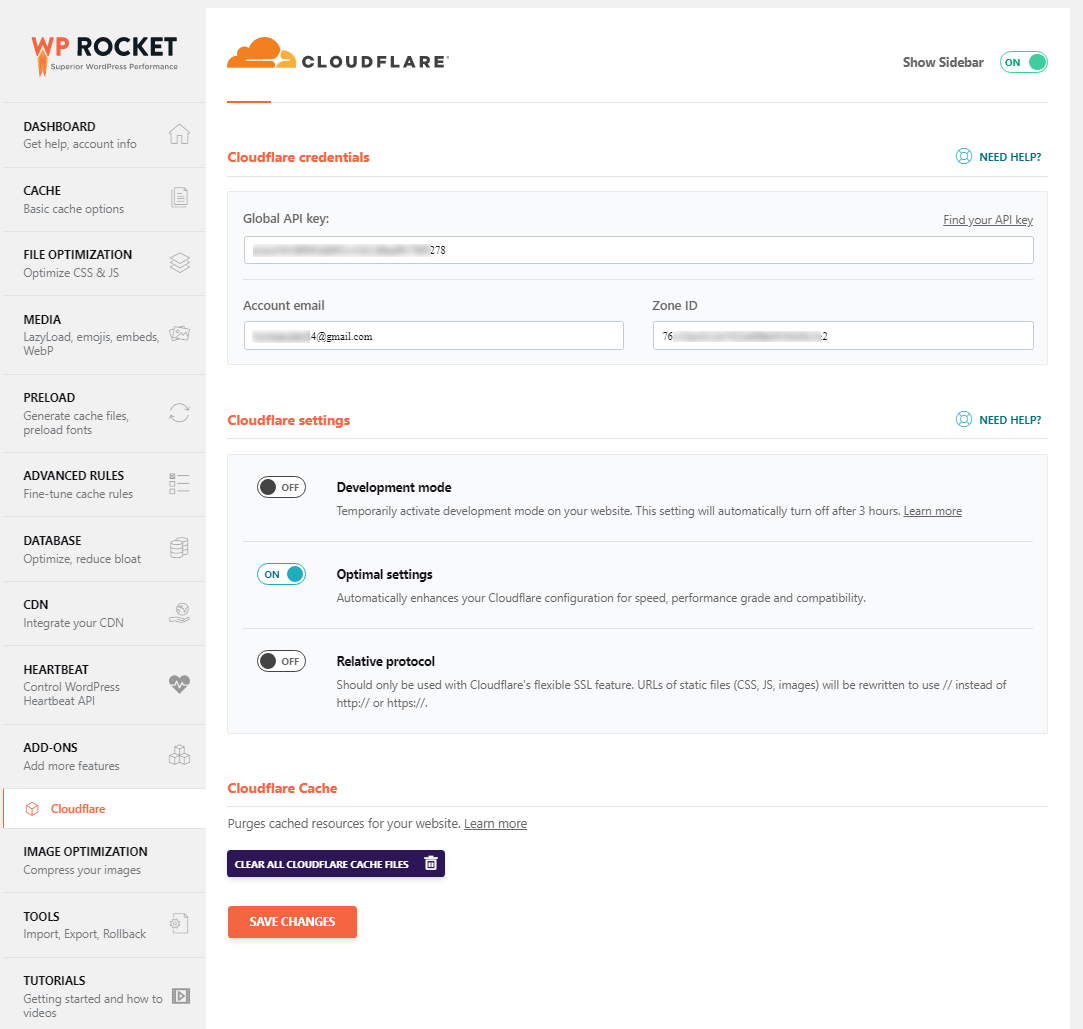
If using Cloudflare, WP Rocket offers a dedicated add-on (see Add-ons section) for deeper integration. You’ll just need your global API key, zone ID, and registered email. Once entered, select “Optimal settings” to auto-configure your Cloudflare settings for speed.
Tip: Always clear both WP Rocket and CDN caches after major updates to your site. This helps ensure visitors see the latest version.
9. Add-ons
WP Rocket includes several built-in add-ons that extend its core functionality and help optimize additional third-party services.
You can toggle these add-ons on or off with a single click. This feature makes it easy to enhance your website’s performance without a complex setup.
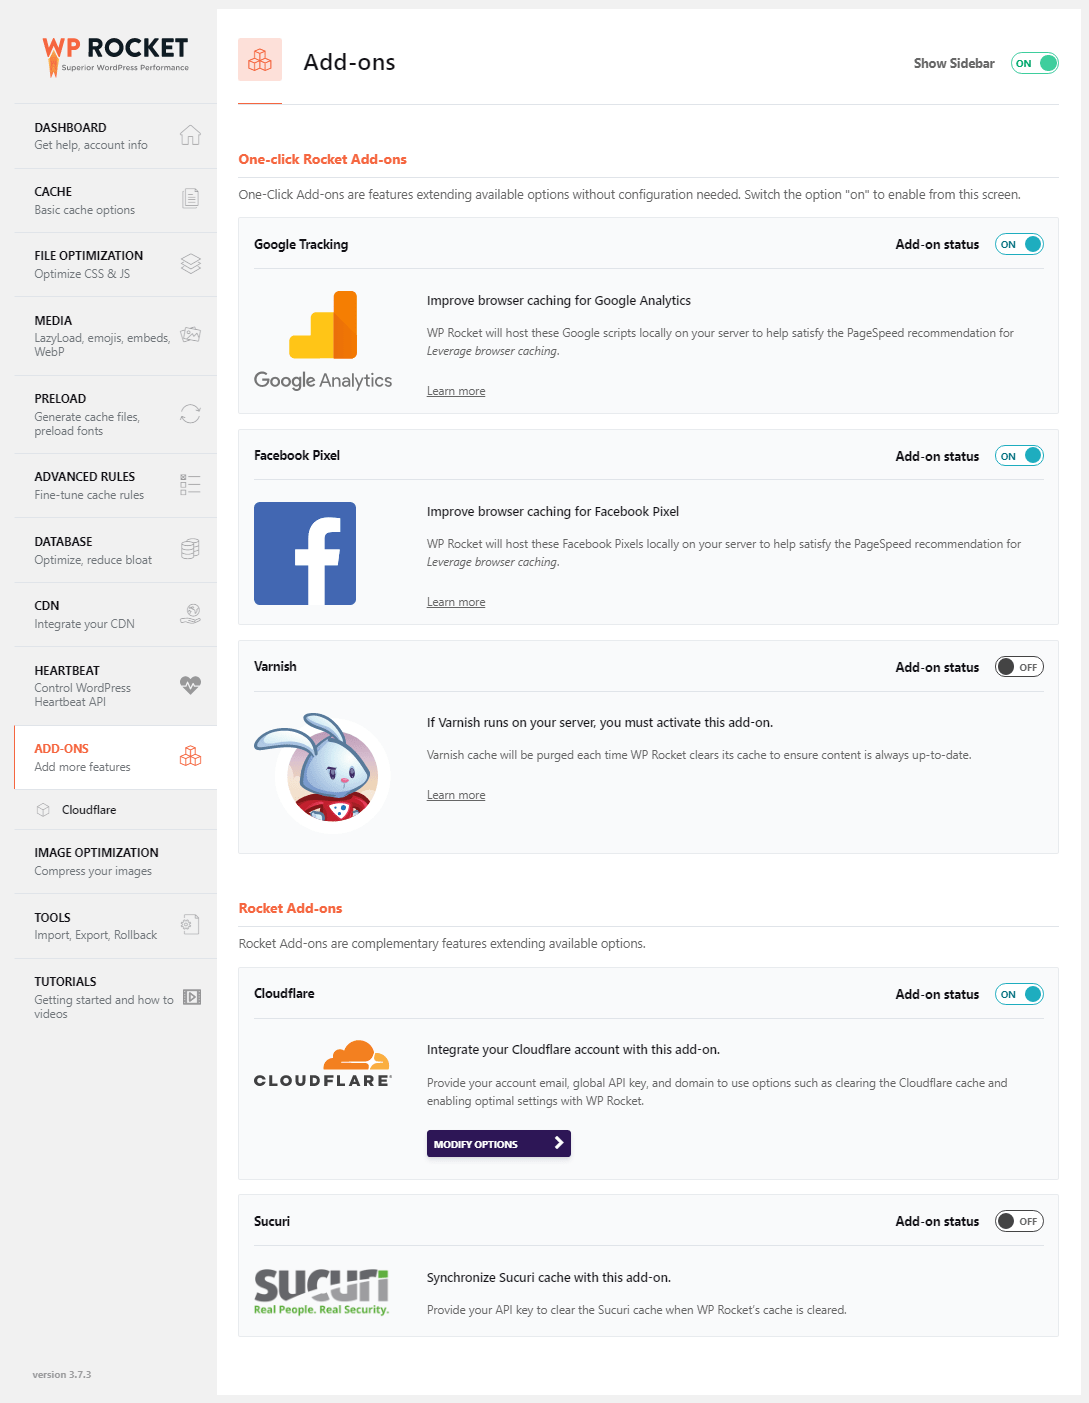
Here are the key add-ons available:
- Google Tracking: This add-on allows you to host Google Analytics scripts locally on your server. Doing so helps eliminate common speed testing issues. These include “leverage browser caching” warnings from tools like GTmetrix or PageSpeed Insights. It improves overall performance scores and reduces external HTTP requests.
- Facebook Pixel: Similar to Google Analytics, Facebook Pixel can slow down your site if not optimized. Enabling this add-on helps improve your browser caching score. It serves the Facebook Pixel script locally. This speeds up load time and ensures better tracking performance.
- Cloudflare: If you’re using Cloudflare as your CDN and security provider, this add-on enables seamless integration. Simply enter your global API key, account email, and zone ID. WP Rocket will then allow you to purge the Cloudflare cache. You can enable development mode. It also applies optimal Cloudflare settings automatically from within the WP Rocket dashboard.
- Varnish: If your site is hosted with providers like WP Engine or Flywheel, enable this add-on. These providers use Varnish caching. The add-on ensures cache clearing works correctly. It adds compatibility with Varnish so that caches are purged automatically when needed.
These add-ons are especially useful for improving performance in external scripts and optimizing how WP Rocket communicates with other systems. Be sure to configure each one appropriately based on your hosting environment and third-party tools in use. as needed:
- Google Tracking: Host Google Analytics scripts locally
- Facebook Pixel: Improve caching scores
- Cloudflare: Seamless integration
- Varnish: Use if on WP Engine or Flywheel
10. Tools
The Tools section in WP Rocket offers utilities for backing up your configuration. It also helps in troubleshooting plugin issues. You can revert to previous versions if needed.
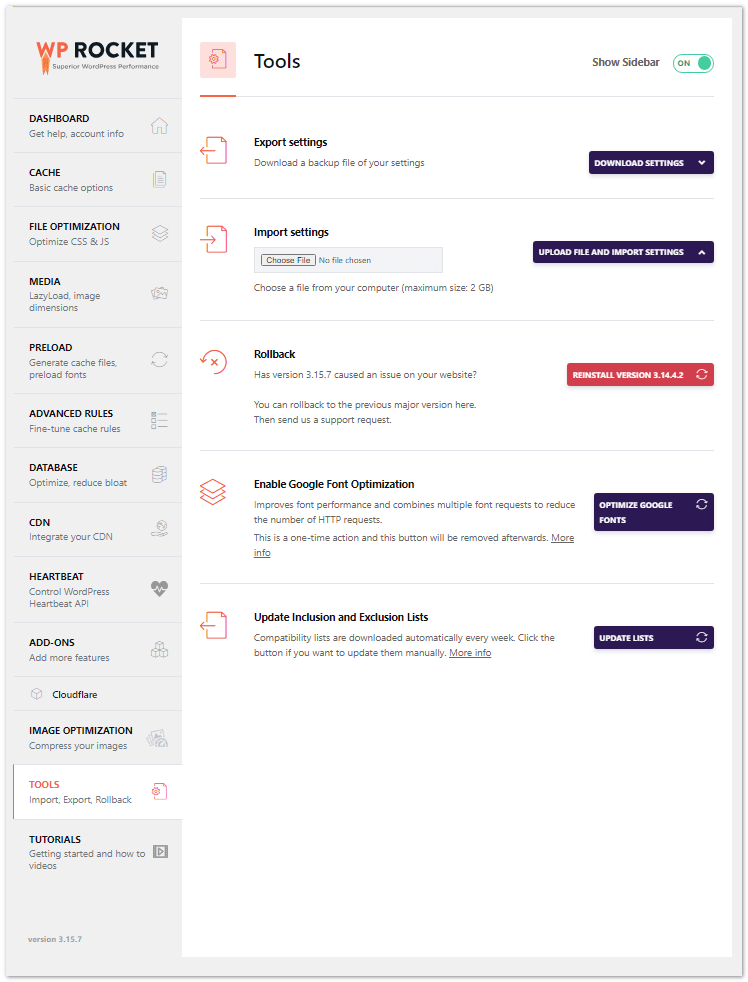
These features are especially useful during updates or when managing multiple WordPress sites.
- Import/Export Plugin Settings: This allows you to save your current WP Rocket configuration and reuse it on another site. It’s a time-saver for developers or agencies managing multiple client sites. You can also use it to back up your optimal settings before making major changes.
- Rollback Feature: If a recent WP Rocket update causes compatibility issues or site errors, you can use the rollback option. It lets you revert to the previous stable version of the plugin with one click. This ensures minimal disruption while waiting for a fix or update.
- Enable Google Font Optimization: This tool allows you to host Google Fonts locally. It reduces external HTTP requests. This speeds up font loading, which helps improve your Core Web Vitals and performance scores.
- Update Inclusion and Exclusion Lists: This feature provides access to fine-tune the plugin’s behavior. You can specify which files or URLs should be included or excluded from optimizations. It’s particularly useful when diagnosing compatibility issues or maintaining custom performance rules.
These tools ensure your configuration is portable, customizable, and resilient to plugin updates or theme changes. WP Rocket becomes a flexible optimization companion for your WordPress site.
Add “Enable Google Font Optimization” and “Update inclusion and exclusion list” features in this
11. HeartBeat
The Heartbeat API is a core feature in WordPress that enables real-time communication between your browser and the server.
It provides useful functionality. Some examples include auto-saving posts, showing real-time notifications, and post locking in the editor. However, it can also increase server load if not properly controlled.
WP Rocket allows you to optimize the Heartbeat API to reduce unnecessary background activity and save server resources.
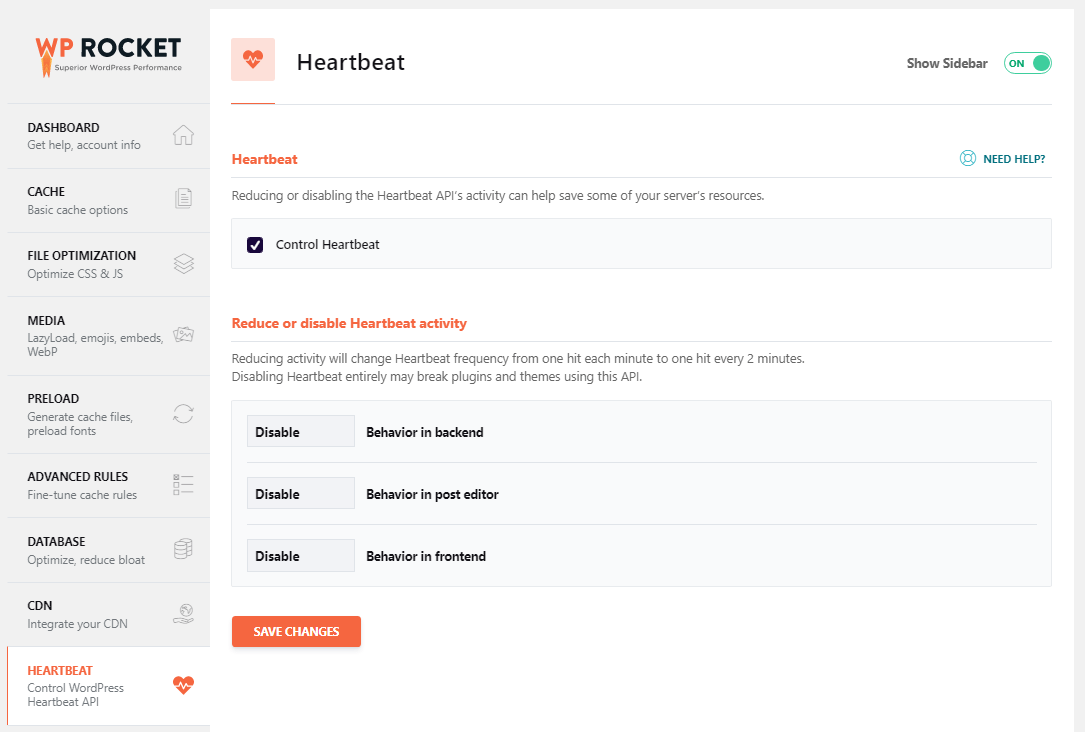
Here’s how you can configure it:
- Reduce Heartbeat Frequency: This option limits how often the Heartbeat API sends requests. You can reduce the frequency in areas like the WordPress dashboard, post editor, and front-end.
- Disable Heartbeat: For some sites, disabling Heartbeat entirely can significantly reduce server resource usage. However, only disable it if you’re not relying on features like auto-save or real-time collaboration.
You can apply these settings selectively:
- Dashboard: Reduce or disable activity here if you don’t need frequent real-time updates.
- Post Editor: Reduce frequency to maintain auto-saving with less load, or disable if you prefer manual saving.
- Frontend: In most cases, it’s safe to disable Heartbeat here unless a plugin relies on it for live updates.
Note: Always test after changing Heartbeat settings to ensure it doesn’t interfere with your workflow or plugin functionality. frequency for dashboard and post editor
- Disable entirely if unnecessary for your site.
12. Tutorials
You can visit this documentation section if you need clarification on how to do page caching properly. Here are the excellent video tutorials that should help you configure this plugin, WP Rocket.
Quick Tip: Best WP Rocket Settings for 2026
- Enable Mobile Cache and LazyLoad.
- Set Cache Lifespan to 24 hours.
- Preload critical fonts and DNS requests.
- Exclude WooCommerce cart/checkout pages from caching.”
Best WP Rocket Settings for Core Web Vitals
WP Rocket offers built-in optimizations to boost Core Web Vitals scores. These include direct impacts on Largest Contentful Paint (LCP), First Input Delay (FID), and Cumulative Layout Shift (CLS). Key settings include:
- LazyLoad for Images/Iframes: Reduces initial page weight, improving LCP.
- Remove Unused CSS: Minimizes render-blocking resources for faster interactivity (FID).
- Delay JavaScript Execution: Prioritizes critical content loading, enhancing LCP and FID.
- Preload Critical Fonts & Assets: Ensures text remains visible during webfont load (CLS).
Enable these WP Rocket settings alongside CDN integration and cache preloading for a seamless, high-scoring performance.
Pro Tip: Test changes in Google PageSpeed Insights after each adjustment to track improvements.
Hostinger Hosting for Better Speed
Hostinger is a highly recommended web hosting provider and is recommended by WordPress officials. Most professionals’ and business blogs’ first choice is Hostinger WordPress hosting.
Hostinger is one of the most popular web hosting companies. It provides a free SSL, a free domain, and a CDN. You can grab this hosting with a 66% discount.
The customer support team’s service and speed are excellent. If you are stuck at page loading time, upgrading your hosting to Hostinger WordPress hosting is best. So, by using the Hostinger deal, you can save up to 66% off the regular price.
For more speed tips, see our guide on WordPress caching plugins.
Pros and Cons of WP Rocket Plugin
Pros
- Dramatically improves page load speeds through efficient caching and optimization. Sites can see reduced load times of over 50%.
- Easy one-click setup. No complicated configuration is needed.
- Clears caches automatically when content is updated, so there’s no worry about having outdated cached versions.
- Works seamlessly with major WordPress functionality like theme and plugin updates. No compatibility issues.
- Boosts SEO by improving site speed metrics that Google values in rankings.
- The inline critical CSS feature reduces render-blocking resources for faster page display.
- Cloudflare integration provides enhanced caching and security.
- Comes with advanced features like cache preloading, lazy loading, and DNS prefetching.
- Highly rated and recommended by leading WordPress experts. Used on over 4.9 million sites.
Cons
- Premium-only (no free version).
- Requires manual configuration for advanced CDN setups.
- May conflict with host-level caching (e.g., Kinsta, WP Engine).
Frequently Asked Questions (FAQs)
What is WP Rocket?
The Full form of WP Rocket is WordPress Rocket. It is one of the premium WordPress caching plugins. This is one of the best performance plugins and improves the page load time with better optimization features.
Is WP Rocket free?
No. WP Rocket is a premium plugin, and it comes with affordable prices in three plans. You can choose one plan and make a purchase, then install it on your site and start file optimization.
Does WP Rocket work?
Yes, 100% it is working well and supports all WordPress hosting. It improves your page load time more than other free caching plugins like WP Super Cache and W3 Total Cache.
How to Configure WP Rocket Settings for Maximum Speed?
The rocket plugin setup is very simple. After purchasing the plugin, you have to download it from the official site. It is not available in the Free WordPress plugin directory. After completing your download, upload into your WordPress site from the dashboard > Plugins > Add New > Upload and Activate now. After activating the plugin, you have to follow the basic Rocket plugin settings in this article. That’s it. Finally, check the speed in the Gtmetrix and Pingdom tools.
How do I uninstall WordPress Rocket?
If you did not like the plugin or are facing any issues with your servers, you could uninstall the WP Rocket plugin. You can uninstall this plugin by using two different methods. They are Manual methods and Uninstallation from the WordPress admin. In the manual process, you can go through FTP or File Manager (available in Web hosting cPanel). Then, remove the WP Rocket folder from the WP-Content > WP Plugin folder. After this manual removal, you must remove the /WP-Content/advanced-cache.php file. That’s it.
What are the best WP Rocket settings for WooCommerce?
Exclude cart/checkout pages from caching and enable user cache for logged-in customers.
What are the best WP Rocket settings for speed?
Enable mobile/user cache, lazy load, file optimization, and preload. Also, integrate a CDN for best results.
Will WP Rocket improve my Core Web Vitals?
Yes. Features like lazy load, file minification, and critical CSS help improve LCP, FID, and CLS metrics.
Does WP Rocket work with all themes and plugins?
WP Rocket is compatible with the most popular themes and plugins. Always test minification settings for compatibility.
Is WP Rocket Worth It?
Absolutely. WP Rocket is one of the easiest and most effective plugins to boost WordPress performance. With optimized settings, you’ll enjoy faster load times, higher rankings, and happier visitors.
👉 Get WP Rocket Now and apply these expert settings today!
Final Words on WP Rocket Settings
Optimizing your WP Rocket settings can skyrocket your WordPress site’s speed, rankings, and conversions.
WP Rocket continues to be the go-to plugin for WordPress speed optimization in 2026. Whether you’re just beginning with WP Rocket or you are exploring its advanced settings. This powerful tool simplifies the complex task of speeding up your website.
This guide has walked you through every essential WP Rocket setup step. It covers everything from WP Rocket beginner settings to expert-level WP Rocket configuration.
By properly configuring the plugin, you’ll ensure smooth Core Web Vitals performance, improve user experience, and ultimately enhance your SEO.
WP Rocket offers a range of features. These include lazy load WP Rocket settings and WP Rocket cache optimization. It also features database optimization and WP Rocket capabilities. Every feature contributes to your WordPress speed optimization goals.
Add in WP Rocket CDN integration. Minify CSS/JS WP Rocket options are also essential. Include preload configurations as well. You’re set for top scores in WP Rocket PageSpeed Insights and Google Core Web Vitals assessments.
In short, if you’re serious about website performance, follow these WP Rocket recommendations. These best WP Rocket settings for 2026 that will future-proof your website’s speed.
They will boost conversions. Moreover, they give your users the blazing-fast experience they expect.
Ready to take action? Configure WP Rocket today and transform your WordPress site into a high-performing powerhouse.
This 2026 guide ensures you’re using the latest features and best practices. Ready to start? Buy WP Rocket Now and transform your site today!
Ready to Optimize Your WP Rocket Settings?
Get faster load times, higher rankings, and happier visitors today.


Hi,
This article is helpful to the new users and I really like it.
thanks for sharing.
This is Very Good Article About WordPress Speed
Wp rocket is very good for sure, but some hosting providers block it and dont allow us to use it, can you recommend some hosting providers who allow it?